Installation
BRAKE CONTROL: BRAKE ACTUATOR (for BOSCH Made): INSTALLATION
1. INSTALL BRAKE ACTUATOR
(a) Install the actuator assembly with bracket to the body with the 3 bolts.
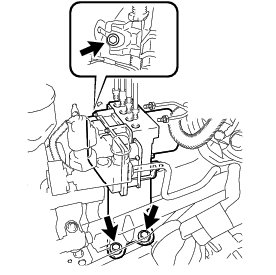
Torque : 19 Nm (195 kgf-cm, 14 ft-lbf)
NOTICE:
Do not damage the brake lines.
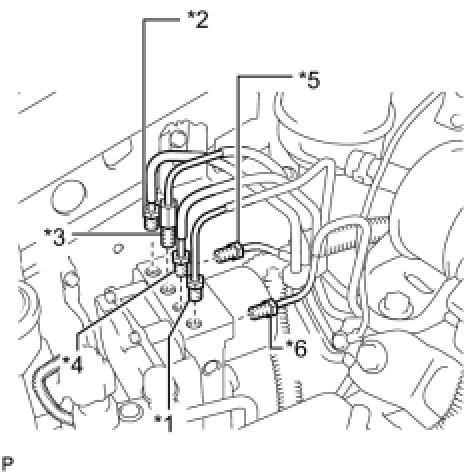
(b) Temporarily tighten each brake line to the correct positions of the actuator assembly with bracket as shown in the illustration.
HINT
* *1: To front wheel cylinder RH
* *2: To front wheel cylinder LH
* *3: To rear wheel cylinder RH
* *4: To rear wheel cylinder LH
* *5: From 2nd master cylinder chamber
* *6: From 1st master cylinder chamber
(c) Using union nut wrenches (10 mm and 12 mm), fully tighten each brake line.
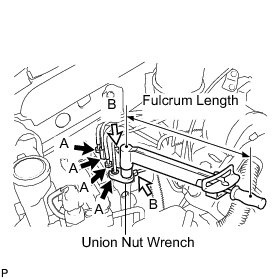
Nut A (10 mm) without a union nut wrench - Torque : 15 Nm (155 kgf-cm, 11 ft-lbf
Nut A (10 mm) with a union nut wrench - Torque : 14 Nm (143 kgf-cm, 10 ft-lbf
Nut B (12 mm) without a union nut wrench - Torque : 19 Nm (194 kgf-cm, 14 ft-lbf
Nut B (12 mm) with a union nut wrench - Torque : 17 Nm (173 kgf-cm, 13 ft-lbf
NOTICE:
* Use a torque wrench with a fulcrum length of 250 mm (9.84 in.).
* This torque value is effective when a union nut wrench is parallel to the torque wrench.
(d) Connect the actuator connector.
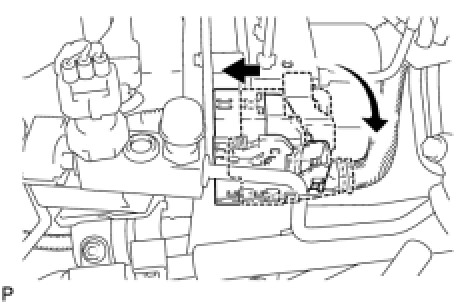
NOTICE:
Make sure that the connector is locked securely.
2. INSTALL RADIATOR RESERVE TANK ASSEMBLY
(a) Install the radiator reserve tank assembly.
(b) Connect the radiator reservoir tank hose.
3. FILL RESERVOIR WITH BRAKE FLUID Service and Repair
4. BLEED BRAKE LINE Service and Repair
5. CONNECT CABLE TO NEGATIVE BATTERY TERMINAL
6. INSPECT BRAKE FLUID LEVEL Service and Repair
7. INSPECT FOR BRAKE FLUID LEAK
8. INSPECT ACTUATOR WITH TECHSTREAM
HINT
Brake Actuator (for BOSCH Made)
9. INSPECT SENSOR SIGNAL
HINT
Test Mode Procedure
10. INSPECT AND CLEAR DTC
HINT
Vehicle Stability Control System (for BOSCH Made)