Installation
CLUTCH: CLUTCH MASTER CYLINDER: INSTALLATION
1. INSTALL CLUTCH MASTER CYLINDER ASSEMBLY
(a) Install a new gasket to the clutch master cylinder assembly.
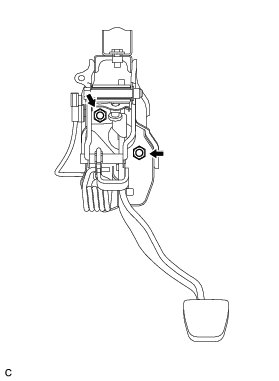
(b) Install the clutch master cylinder with the 2 nuts.
Torque : 12 Nm (120 kgf-cm, 9 ft-lbf)
2. CONNECT CLUTCH LINE

(a) Using a union nut wrench (10 mm), connect the clutch line.
without a union nut wrench - Torque : 15 Nm (155 kgf-cm, 11 ft-lbf)
with a union nut wrench - Torque : 14 Nm (143 kgf-cm, 10 ft-lbf)
NOTICE:
* Use a torque wrench with a fulcrum length of 250 mm (9.84 in.).
* This torque value is effective when the union nut wrench is parallel to the torque wrench.
3. CONNECT CLUTCH RESERVOIR TUBE
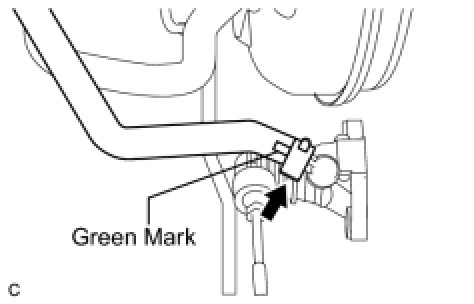
(a) Connect the clutch reservoir tube to the clutch master cylinder with the clip.
NOTICE:
* Connect the clutch reservoir tube so that it will not be twisted.
* Make sure that the green mark is positioned as shown in the illustration.
4. CONNECT CLUTCH MASTER CYLINDER PUSH ROD CLEVIS
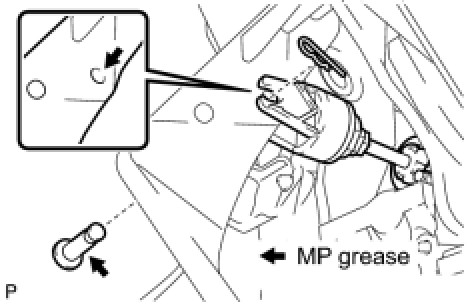
(a) Apply MP grease to the contact surfaces of the pin and clevis bushing.
(b) Connect the clevis to the clutch pedal with the pin and clip.
HINT
Install the pin from the left side of the vehicle.
5. INSTALL BRAKE BOOSTER ASSEMBLY
Installation.
6. FILL BRAKE FLUID RESERVOIR Service and Repair
7. BLEED CLUTCH LINE Procedures
8. INSPECT FLUID LEVEL Testing and Inspection
9. INSPECT FOR FLUID LEAK
HINT
Check for leaks in the clutch system.
10. INSPECT AND ADJUST CLUTCH PEDAL SUB-ASSEMBLY
Testing and Inspection.
11. INSTALL COMBINATION METER ASSEMBLY Installation
12. INSTALL INSTRUMENT CLUSTER FINISH PANEL Installation
13. INSTALL LOWER INSTRUMENT PANEL FINISH PANEL Installation
14. INSTALL NO. 1 INSTRUMENT PANEL SUB-ASSEMBLY Installation
15. INSTALL LOWER INSTRUMENT PANEL FINISH PANEL LH Installation
16. INSTALL COWL SIDE TRIM SUB-ASSEMBLY LH Installation
17. INSTALL FRONT DOOR SCUFF PLATE LH Installation